Spring Boot profiles
Spring boot profiles allows us to configure, parameterize or display information depending on the profile in which we decide to start the application.
As I understand you can not change profiles dynamically or at runtime.
Of the most known cases is configuring the application by environments of execution like for example:
- Development
- Testing or QA
- Production
There are infinite scenarios to use Spring Boot profiles, but as an example we can configure to which database we want to connect our application.
For this tutorial we will change the database connection URLs depending on the profile and show you two ways to assign the profile for Spring Boot.
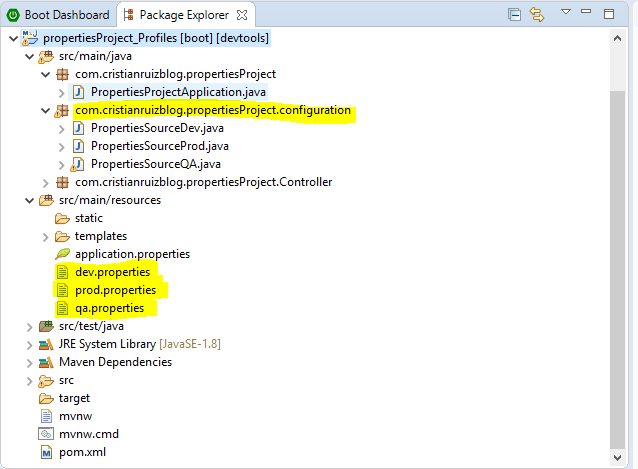
based on the image above, create 3 properties files in the folder src/main/resources:
- dev.properties
- qa.properties
- prod.properties.
There are two ways to load properties files depending on the profile, in this tutorial you can see how to do it with the notation @Profile, but in the video at the end include the example of convection over configuration of Spring Boot.
Spring Boot Profiles using @Profile
The project will have the same structure as the project in the video of the previous tutorial (Spring Boot Properties tutorial). The difference is that instead of a configuration file for the properties source we will create one for each environment:
- PropertiesSourceDev.java
- PropertiesSourceQa.java
- PropertiesSourceProd.java
Project structure
Up to this point you should have something similar to this
as you could see in the previous tutorial the Java file “PropertiesSource.java” is annotated with the notation @Configuration and @PropertySource. To define the Spring Boot profile that we want to use, we will add the notation @Profile and in the constructor we will specify the profile for that file.
Example:
- @Profile (“dev”)
- @Profile (“qa”)
- @Profile (“default”)
If no profile is specified to start, Spring Boot will start with default profile.
In this example we will use production as default.
Look at the following code, make sure that each Java file is pointing to its respective properties file and notation @Profile.
Package com.cristianruizblog.propertiesProject.Configuration;

Import org.springframework.Context.Annotation.Configuration;
import org.springframework.Context.annotation.Profile;
Import org.springframework.Context.Annotation.PropertySource;

@Configuration
@PropertySource ({"Classpath: dev.properties"})
@Profile ("dev")
public class PropertiesSourceDev {
}
***********************************************
@Configuration
@PropertySource ({"Classpath: qa.Properties"})
@Profile ("qa")
public class PropertiesSourceQa {
}
***********************************************
@Configuration
@PropertySource ({"Classpath: prod.properties"})
@Profile ("default")
public class PropertiesSourceProd {
}
The next step will be to add the same property within the properties files.
Dev. Properties:
    database.url = http:localhost/devdatabase
********************************************
QA. Properties:
    database.url = http:localhost/qadatabase
********************************************
Prod. properties
    Database.url = http:localhost/proddatabase
And to finish you have to specify in the application.properties with which profile start the application, and this is done with the following property.
#default or empty equal to default
#puedes Write dev or QA
#And see the different behaviors.
Spring.profiles.active =
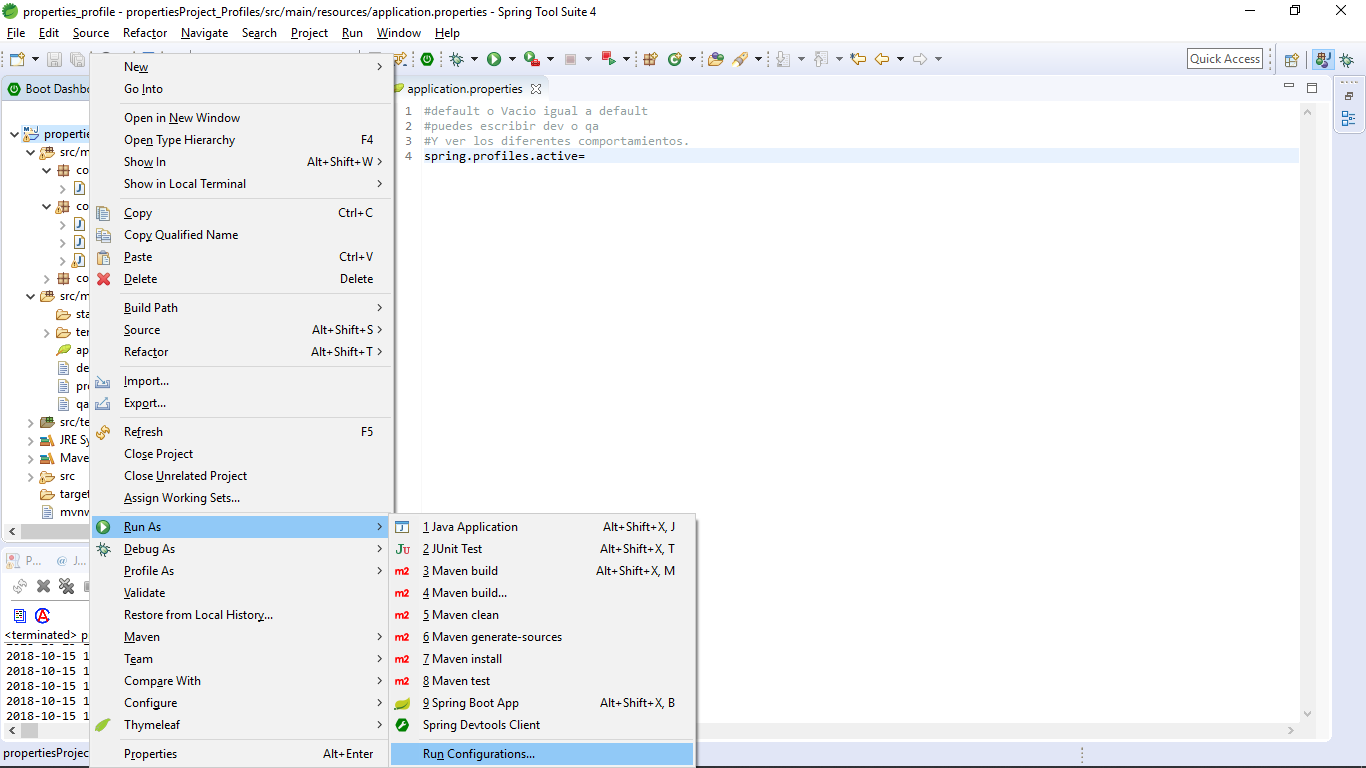
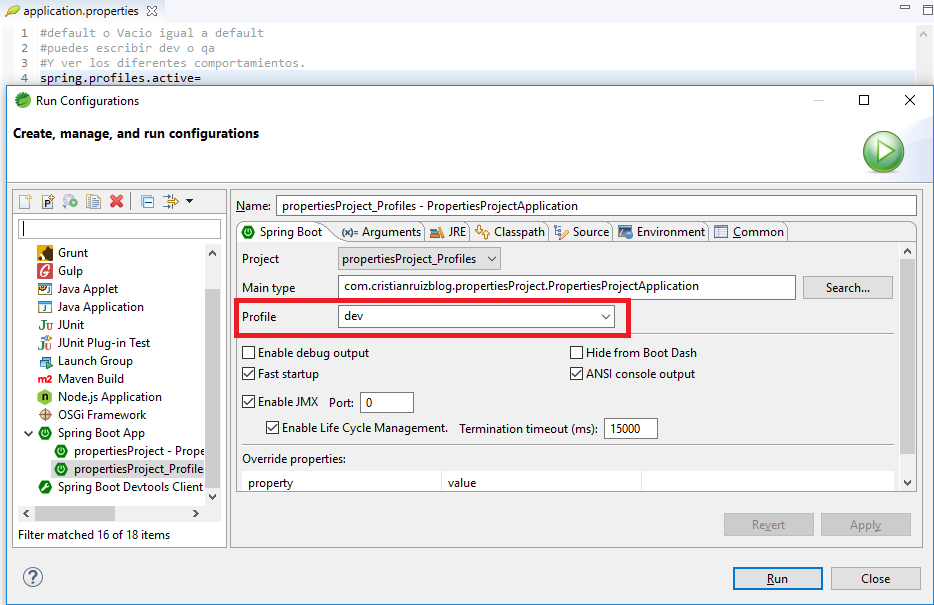
Another option to specify the profile is to send an execution parameter, using STS:
- Press Right click on the project
- Put the mouse over the “Run As” option
- Select the last option deployed “Run settings”
- The third option is a text field called profile, there you can write the profile with which you want to start the application, note that this profile overwrite the assigned in the application.properties.
Obviously you have to show the information on some way, I have a Controller where I get the value of Properties with the notation @Value and send it to a view using a model. 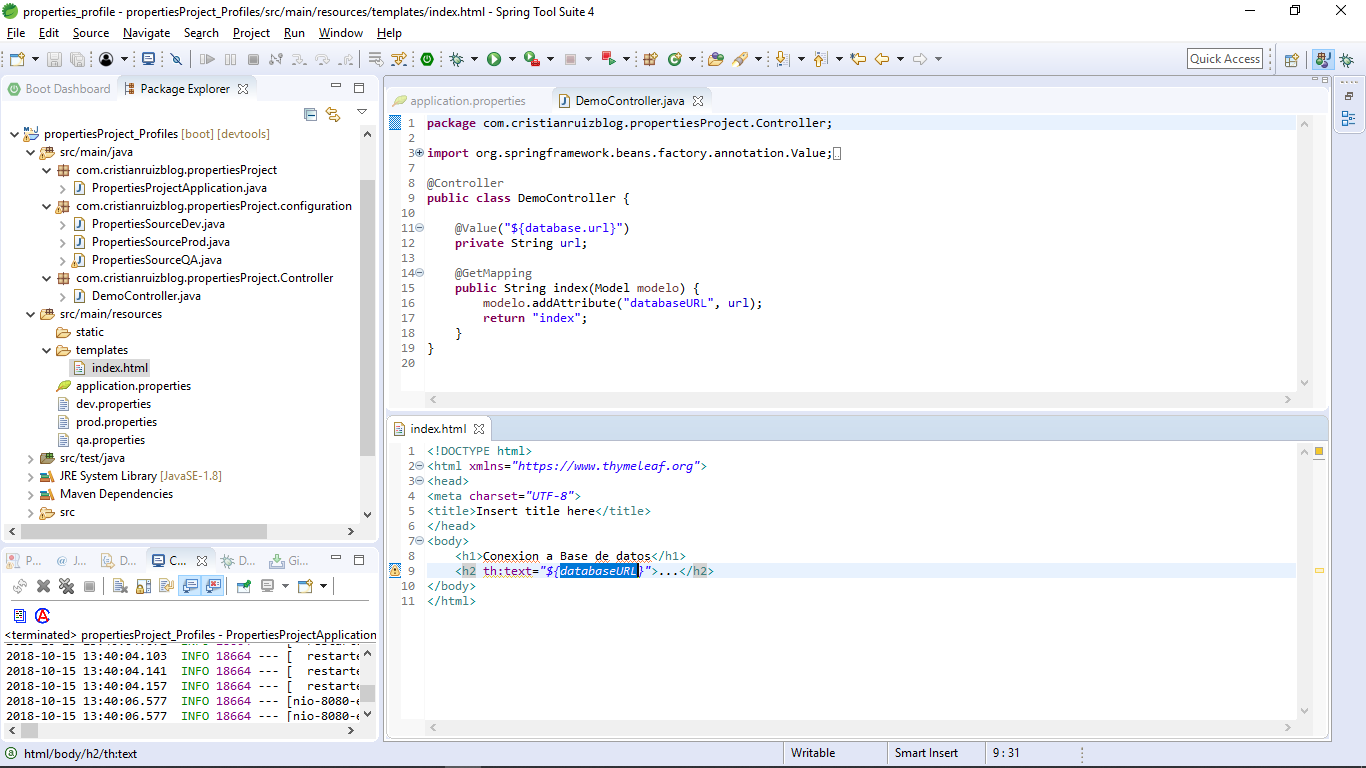 I invite you to activate the different profiles and study the behavior of Spring Boot profiles, also to assign the profile with the two methods described.
[ALERT]
If the class has a defined profile and is not the active profile, Spring Framework context will completely ignored that class.
[BONUS]
Do not hesitate to visit my GitHub repository to compare the code or watch my video where I explain a little more about Spring Boot profiles
Convention over configuration
https://github.com/cruizg93/CristianRuizBlog-SpringBootProfileProperties/tree/master
Properties configuration with @Profile annotation
https://github.com/cruizg93/CristianRuizBlog-SpringBootProfileProperties/tree/annotation-config
Thanks for getting to the end of this post


