Spring Boot Profiles | Part 2
In this tutorial I will use Spring Boot profiles with spring Framework Dependency injection to handle the instances of the service layer.
Spring Boot Profiles allows us to configure the application for environments such as development, QA and/or production as you could see in the previous tutorial. (spring boot profiles part 1).
If you’re just starting out and getting to know Spring Framework This can be a little confusing for you. But keep reading, I’ll explain it carefully step by step so you can understand.
Stage
Let’s say we have a local Web application that can be run on several operating systems like Windows, Linux and MacOs.
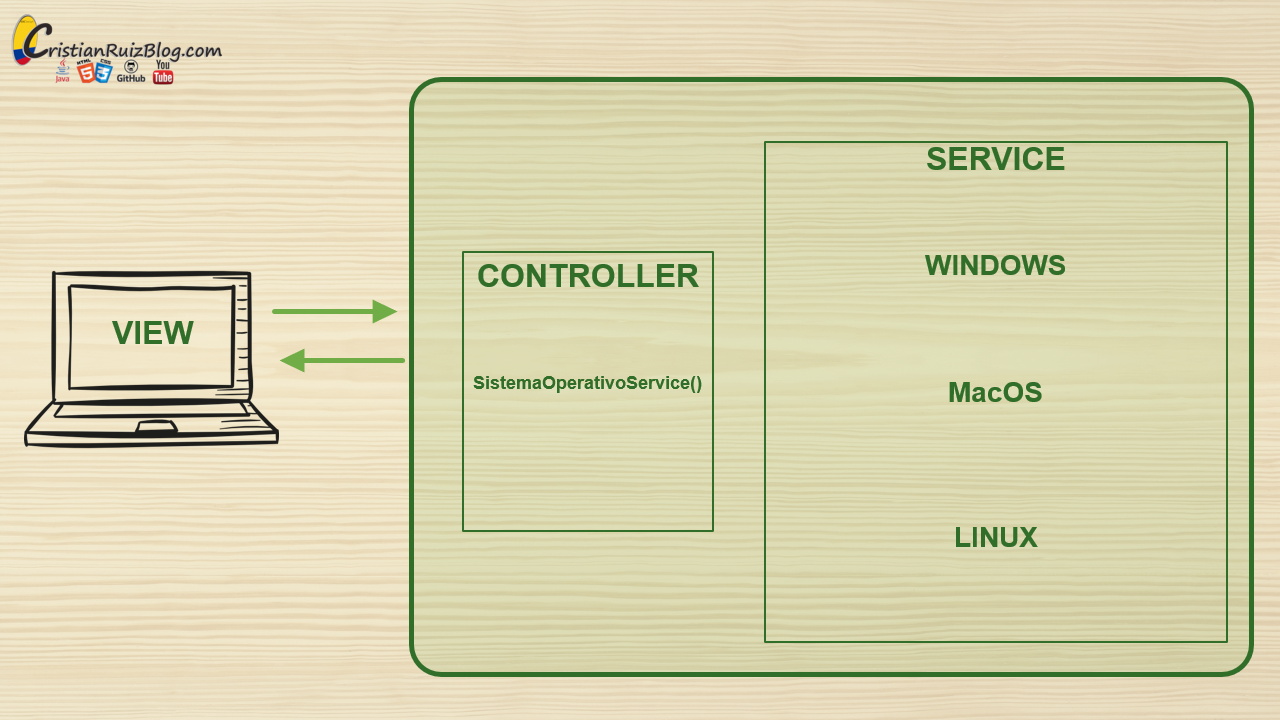
But each one has its own individual configuration, such as ports, services, routes, etc. Example of what we build using profiles:

In this case we will have 3 implementations of the SistemaOperativoService.java service and using the annotation @Profile Spring Boot will decide which class instantiate.
Execution
We will need to perform the following steps.
- Create a Spring Boot Web project with the following dependencies (web, Thymeleaf) devtools is optional.
- Create the view-to-controller communication:
- Create a DemoController.java with a method that loads the index.html view
- Create an HTML called Index and write the basic structure.
- Create a service interface
- Create three classes that implement the previous interface and annotate them with @Service and @Profile respectively (Win, Mac, Linux)
- Adds the property of active profiles to application.properties
- Start Spring boot.
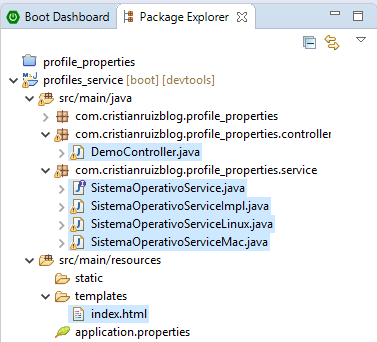
Your folder structure should be similar to this.
DemoController. java
@Controller
public class DemoController {
	@Autowired
	Private SistemaOperativoService sistemaOperativoService;

	@GetMapping
	Public String index (model model) {
		model.addAttribute("os", sistemaOperativoService.getSitemaOperativo());
		return "index";
	}
}
Index.html
<!DOCTYPE html>
<html>
<head>
   <meta charset="UTF-8">
   <title>Insert Title here</title>
</head>
<body>
    <h1>Operating system</h1>
    <h2 th:text="${os}">...</h2>
</body>
</html>
SistemaOperativoService.java
Public interface SistemaOperativoService {

	Public String getSitemaOperativo();
}
SistemaOperativoServiceImpl.java
//@Service marks this class as a component
//and load it into the context of spring boot
//As long as it corresponds to the active profile
@Service
@Profile ("default")
public class SistemaOperativoServiceImpl
                   implements SistemaOperativoService {

    @Override
    Public String getSitemaOperativo() {
        return "WIN10";
    }
}
SistemaOperativoServiceLinux.java
//@Service marks this class as a component
//and load it into the context of spring boot
//As long as it corresponds to the active profile
@Service
@Profile ("LINUX")
public class SistemaOperativoServiceLinux
                       implements SistemaOperativoService {

    @Override
    Public String getSitemaOperativo() {
        return "Linux";
    }
}
SistemaOperativoServiceMac.java
//@Service marks this class as a component
//and load it into the context of spring boot
//As long as it corresponds to the active profile
@Service
@Profile ("MAC")
public class SistemaOperativoServiceMac
                  implements SistemaOperativoService {

    @Override
    Public String getSitemaOperativo() {
        return "MacOS";
    }
}
application.properties
spring.profiles.active = LINUX
In the following Video you will see this in practice, also I will explaining step by step and introducing the famous property of Spring Framework called injection of dependencies.
Github Repository:https://github.com/cruizg93/CristianRuizBlog-SpringBootProfileServices


