Spring boot Security login with MYSQL
We will create a simple but pretty login as we did here, with a user with role “user” and another user “ADMIN”.
To start you should know how to connect your application with the MYSQL database. If you do not know how you can look at my tutorial where I explain. Spring-boot-MySQL.
Video Version.
In case you want to see the video where I program this tutorial step by step here I leave it. But it just keeps coming down.
Step by step
Set up view
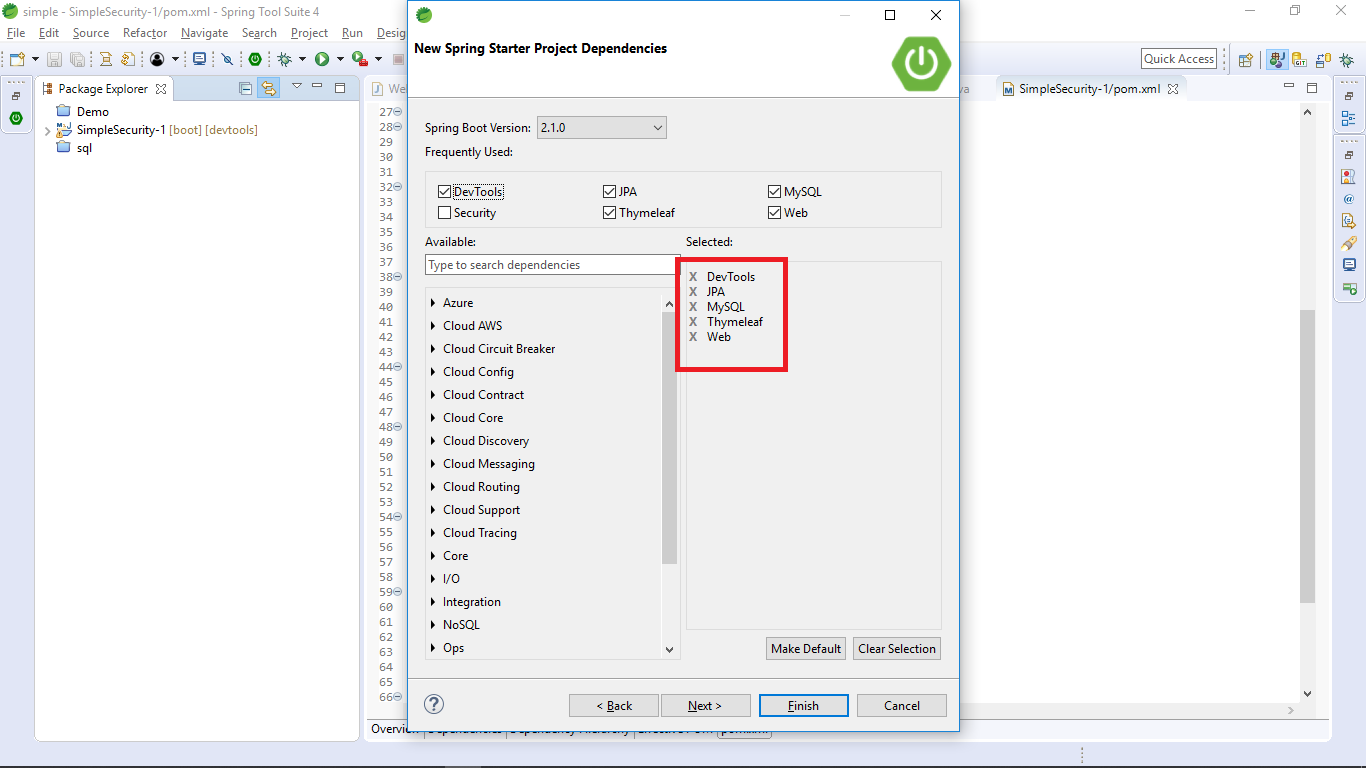
- Create a Spring Boot project, with the respective dependencies.
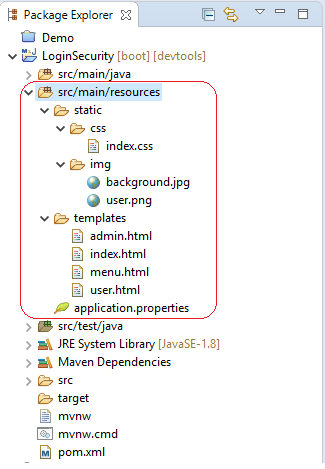
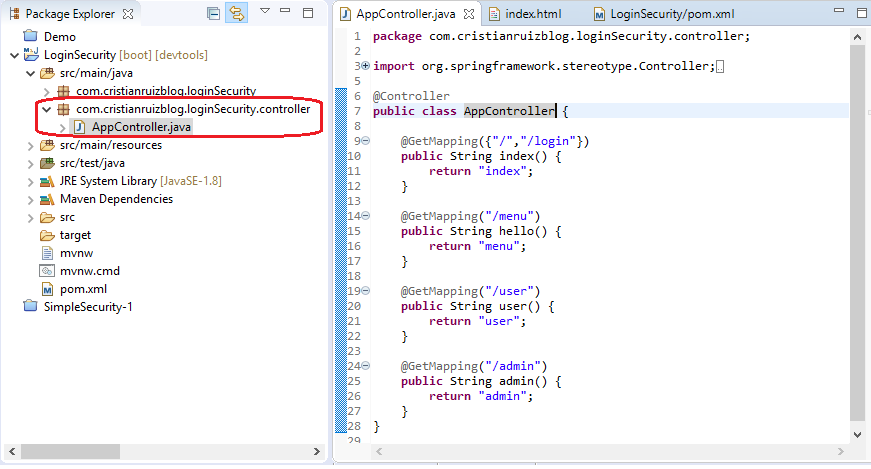
- Create HTML pages for login and role access. The design of the page you can see here, and the code can be downloaded from here. Make sure you have the file structure in the following way.
- Menu. HTML: Source code
<!DOCTYPE html>
<html xmlns="http://www.w3.org/1999/xhtml" xmlns:th="http://www.thymeleaf.org" xmlns="http://www.w3.org/1999/xhtml" xmlns:th="http://www.thymeleaf.org"></html xmlns="http://www.w3.org/1999/xhtml" xmlns:th="http://www.thymeleaf.org">
      xmlns: sec = "http://www.thymeleaf.org/thymeleaf-extras-springsecurity3" >
    <head></head>
        <title>Hello World!</title>

    <body></body>
        <h1 th:inline="text">Hello[[${#httpServletRequest.remoteUser}]]!</h1>
        <form th:action="@{/logout}" method="post"></form>
            <input type="submit" value="Cerrar Sesion">

        <h1><a th:href="@{/admin}">Admin</a> | <a th:href="@{/user}">User</a></h1>
Admin. html
<h1>Admin Yes</h1>
User. html
<h1>User Yeah!</h1>
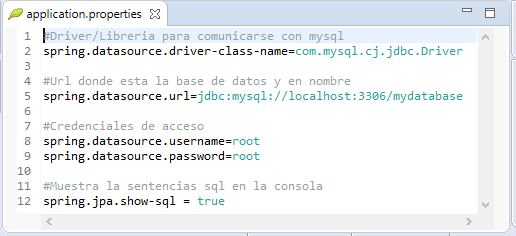
- Configures the connection to the database in the file application. Properties: Source code
- Create the handler that will redirect the HTTP request (in index. HTML make sure that in the form the method is get and the action is “/menu“):
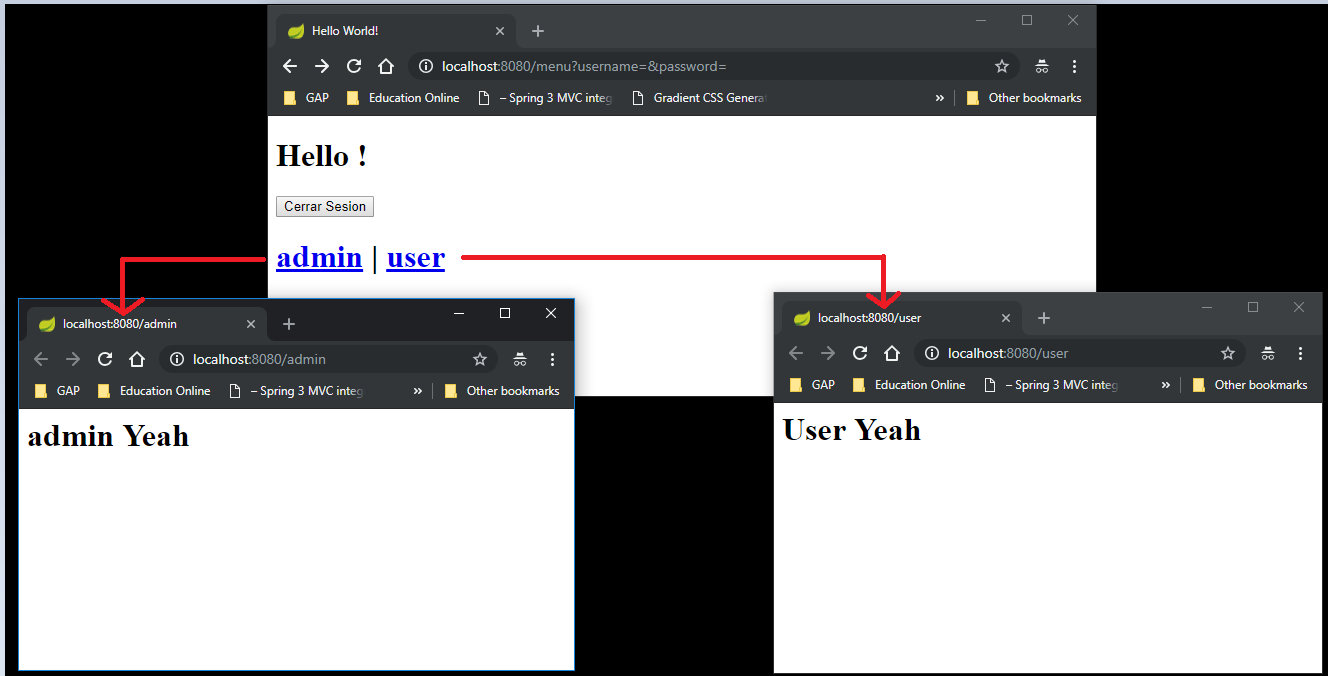
<form class="col-12" th:action="@{/menu}" method="get"></form> - Start the application with http://localhost:8080/and you must have something similar to the first image and when you press the button “enter” You have the second image. If you have problems displaying the images or the CSS style, verify that the image and the link of the CSS have the tag th appropriately.
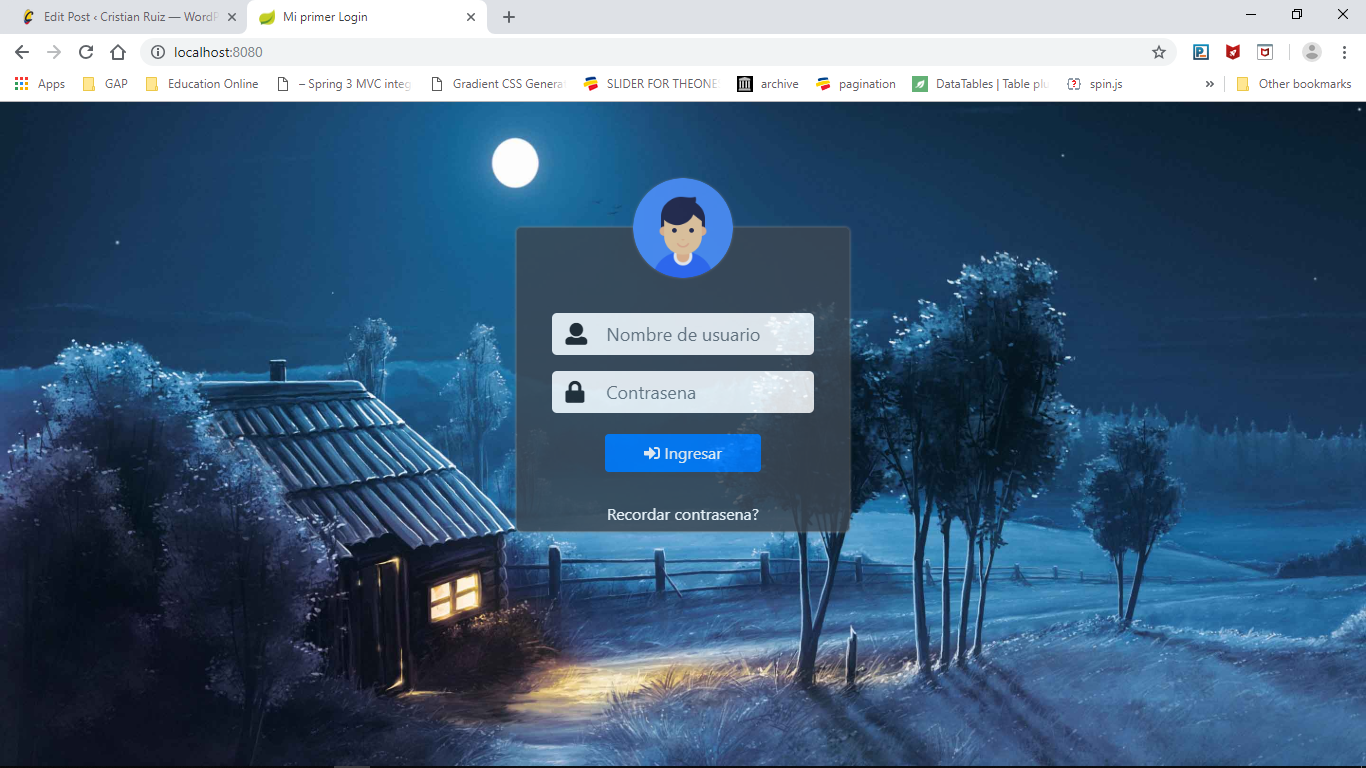
Project Login Index
Securing the Application
- Add the dependency of Spring Boot Security to your pom. xml: Source code
<!-- Security --> <dependency></dependency> <groupId>Org. springframework. Boot</groupId> <artifactId>Spring-boot-starter-security</artifactId> <!-- *** -->- The previous step enables the security component, but you have to configure it. Create the next class that inherits from WebSecurityConfigurerAdapter. Source code
Package com. cristianruizblog. loginSecurity. config;

import org. springframework. Beans. Factory. Annotation. autowired;
Import org. Springframework. Context. Annotation. Bean;
Import org. Springframework. Context. Annotation. Configuration;
import org. springframework. security. config. annotation. Authentication. Builders. AuthenticationManagerBuilder;
import org. springframework. security. config. annotation. Web. Builders. HttpSecurity;
import org. springframework. security. config. annotation. Web. Configuration. EnableWebSecurity;
import org. springframework. security. config. annotation. Web. Configuration. WebSecurityConfigurerAdapter;
import org. springframework. Security. Crypto. Bcrypt. BCryptPasswordEncoder;

Import com. cristianruizblog. loginSecurity. Service. UserDetailsServiceImpl;

@Configuration
@EnableWebSecurity
public class WebSecurityConfig extends WebSecurityConfigurerAdapter {

    necessary to prevent security from being applied to the resources
    such as CSS, images and javascripts
    string [] resources = new String [] {
            "/include/* *", "/css/* *", "/icons/* *", "/img/* *", "/js/* *", "/layer/* *"
    };

    @Override
    protected void Configure (HttpSecurity http) throws Exception {
        http
            . AuthorizeRequests ()
	        . antMatchers (Resources). PERMITALL ()
	        . AntMatchers ("/", "/index-en"). PermitAll ()
	        . AntMatchers ("/admin *"). Access ("HasRole (' admin ')")
	        . antMatchers ("/user *"). Access ("HasRole (' user ') or hasRole (' ADMIN ')")
                . AnyRequest (). Authenticated ()
                . and ()
            . FormLogin ()
                . LoginPage ("/login")
                . PERMITALL ()
                . DEFAULTSUCCESSURL ("/menu")
                . FAILUREURL ("/login? error = True")
                . UsernameParameter ("username")
                . PasswordParameter ("password")
                . and ()
            . Logout ()
                . PERMITALL ()
                . LOGOUTSUCCESSURL ("/login? Logout");
    }
    BCryptPasswordEncoder BCryptPasswordEncoder;
    Create the password encryption
    @Bean
    Public BCryptPasswordEncoder PasswordEncoder () {
		BCryptPasswordEncoder = new BCryptPasswordEncoder (4);
The number 4 represents how strong you want the encryption.
It can be in a range between 4 and 31.
If you do not put a number the program will use one randomly each time
That you start the application, so your encrypted passwords will not work well
        return bCryptPasswordEncoder;
    }

    @Autowired
    UserDetailsServiceImpl UserDetailsService;

    Registers the service for users and the password encryption
    @Autowired
    public void ConfigureGlobal (AuthenticationManagerBuilder auth) throws Exception {

        Setting Service to find User in the database.
        And Setting PassswordEncoder
        Auth. UserDetailsService (userDetailsService). PasswordEncoder (PasswordEncoder ());
    }
}
First of all when you copy this class you will get an error with the object UserDetailsServiceImpl which we will create after this explanation.
As a second will explain the configuration implemented in the Configure method:
- The AuthorizeRequests () method allows you to restrict and/or access request HTTP
- AntMatchers (): A list of URLs that correspond to a RequestMapping as we do in the controllers.
- PERMITALL (): Specifies that these URLs are accessible by anyone.
- Access (): Allows access by fulfilling the expression, in this case we have the expression “hasRole ()”. Where it verifies if the user has that specific Role.
- AnyRequest (): Since the configuration is linear putting this method at the end interprets the request to URLs that were not described, and in conjunction with the method authenticated () allows and gives access to any user that is authenticated.
- The FromLogin () method. Allows you to customize the logon process
- LoginPage (): Indicates the URL of the logon page
- DEFAULTSUCCESSURL (): Indicates which URL will be redirected when the user logs on.
- FAILUREURL (): Indicates which URL will be redirected when logon fails.
- UsernameParameter () and PasswordParameter (): Indicates the name of the parameters respectively.
- The logout () method: Customizes the logoff process.
- LOGOUTSUCCESSURL (): Indicates the URL where it will be redirected when the user logs off.
- The previous step enables the security component, but you have to configure it. Create the next class that inherits from WebSecurityConfigurerAdapter. Source code
Service Layer and Repository
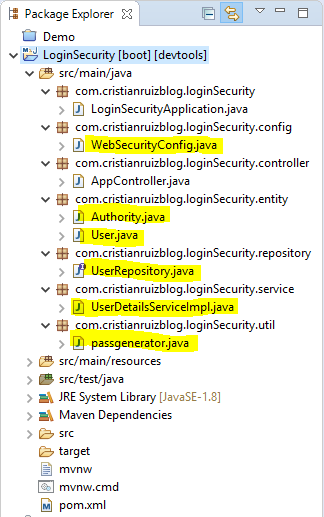
- We will start by creating the following file structure:
- Entities | Entity: Following the guidelines specified by the Spring 5.2.0 documentation, two tables are required, one for users and one for Roles (known as Authorities). Official documentation. And this is the implementation with Spring JPA and hibernate.
-
- Authority: Source Code
Package com. cristianruizblog. loginSecurity. Entity; Import javax. persistence. Column; Import javax. persistence. Entity; Import javax. persistence. GeneratedValue; Import javax. persistence. GenerationType; Import Javax.persistence.Id; @Entity public class Authority { @Id @GeneratedValue (strategy = GenerationType. AUTO) Private Long ID; @Column Private String Authority; Public String getAuthority () { return authority; } public void setAuthority (String authority) { this. authority = Authority; } } - User: Source Code
Package com. cristianruizblog. loginSecurity. Entity;

Import java. util. Set;
Import javax. persistence. Column;
Import javax. persistence. Entity;
Import javax. persistence. FetchType;
Import javax. persistence. GeneratedValue;
Import javax. persistence. GenerationType;
Import Javax.persistence.Id;
Import javax. persistence. JoinColumn;
javax. Persistence. Jointable import;
Import javax. persistence. ManyToMany;

Import com. cristianruizblog. loginSecurity. entity. Authority;

@Entity
public class User {

@Id
@GeneratedValue (strategy = GenerationType. AUTO)
Private Long ID;

@Column
Private String username;

@Column
private String password;

@Column
Private Boolean enabled;

@ManyToMany (fetch = FetchType. EAGER)
@JoinTable (name = "Authorities_users",
JoinColumns = @JoinColumn (name = "usuario_id"),
InverseJoinColumns = @JoinColumn (name = "authority_id"))
Private Set<Authority> Authority;</Authority>

Getters and Setters

@Override
public int HashCode () {
final int prime = 31;
int result = 1;
result = Prime * result + ((id = = null)? 0: Id. HashCode ());
return result;
}

@Override
public boolean equals (Object obj) {
if (this = = obj)
return true;
if (obj = = null)
return false;
if (GetClass ()! = obj. GetClass ())
return false;
User other = (user) obj;
if (id = = NULL) {
if (other.id! = null)
return false;
} else if (! ID. Equals (other. id))
return false;
return true;
}

@Override
Public String toString () {
return "User[id=" + id + ", username=" + username + ", password=" + password + "]";
}

}
- Authority: Source Code
-
- Repositories | Data access: At the moment we have a single interface that inherits from CrudRepository and where we declare a method where it is searched by username. If you need a little more explanation about this you can see these tutorials. JPA Part 1 and JPA Part 2. Source code
Package com. cristianruizblog. loginSecurity. Repository; Import java. util. Optional; import org. springframework. Data. Repository. CrudRepository; import org. springframework. stereotype. Repository; Import com. cristianruizblog. loginSecurity. entity. User; @Repository Public interface UserRepository extends CrudRepository<User, long=""> {</User,> Public Optional<User> FindByUsername (String username);</User> } - Service: We will need to create the implementation for the interface UserDetailsService, which is within the dependency of spring Security source code
Package com. cristianruizblog. loginSecurity. Service;

Import java. util. ArrayList;
Import java. util. List;

import org. springframework. Beans. Factory. Annotation. autowired;
import org. springframework. Security. Core. GrantedAuthority;
import org. springframework. Security. Core. Authority. SimpleGrantedAuthority;
import org. springframework. Security. Core. Userdetails. User;
import org. springframework. Security. Core. Userdetails. userdetails;
import org. springframework. Security. Core. Userdetails. UserDetailsService;
import org. springframework. Security. Core. Userdetails. UsernameNotFoundException;
import org. springframework. stereotype. Service;

Import com. cristianruizblog. loginSecurity. entity. Authority;
Import com. cristianruizblog. loginSecurity. Repository. UserRepository;

@Service
public class UserDetailsServiceImpl implements UserDetailsService {

    @Autowired
    UserRepository UserRepository;

    @Override
     Public UserDetails LoadUserByUsername (String username) throws UsernameNotFoundException {

     Find the user with the repository and if there is no launching a exception
     com. cristianruizblog. loginSecurity. entity. User =
                 UserRepository. FindByUsername (username). OrElseThrow (()-> New UsernameNotFoundException ("no user"));

    Map our Authority list with the spring security
    List grantList = new ArrayList ();
    For (Authority Authority: getAuthority ()) {
        ROLE_USER, ROLE_ADMIN,..
        GrantedAuthority GrantedAuthority = new SimpleGrantedAuthority (authority. getAuthority ());
            GrantList. Add (grantedAuthority);
    }

    Create the UserDetails object that is going to be in session and return it.
    UserDetails user = (UserDetails) new user (to put. GetUsername (), to set. GetPassword (), grantList);
         return user;
    }
}
Create users.
We will need to insert data into the tables that we have in the database. We will start by creating the users and authorities and then assign the cross.
Users: In order to create a user, we will need the encrypted password so we can create the following class to simulate the encryption. Source code
Package com. cristianruizblog. loginSecurity. util;

import org. springframework. Security. Crypto. Bcrypt. BCryptPasswordEncoder;

public class Passgenerator {

    public static void Main (String... args) {
        BCryptPasswordEncoder BCryptPasswordEncoder = new BCryptPasswordEncoder (4);
        The String that we send to the method encode is the password that we want to encrypt.
	System. Out. println (bCryptPasswordEncoder. Encode ("1234"));
    }
}
This class must be run as a Java application, and the encrypted password will appear on your console.
Now we will create a user admin and user
Replaces the word password so it appeared on your console in the previous step.

INSERT INTO User (ID, enabled, password, username)
VALUES (1, 0b1, "password", "admin");

INSERT INTO User (ID, enabled, password, username)
VALUES (2, 0B1, "password", "user");
INSERT INTO Authority (ID, authority) VALUES (1, "ROLE_ADMIN");
INSERT INTO Authority (ID, authority) VALUES (2, "ROLE_USER");
INSERT INTO authorities_users (usuario_id, authority_id) VALUES (1.1);
INSERT INTO authorities_users (usuario_id, authority_id) values (1.2);
INSERT INTO authorities_users (usuario_id, authority_id) VALUES (2.2);
Caution:
You have to change the index. HTML a little. The action must be pointed to/login and the method should be post.
<form class="col-12" th:action="@{/login}" method="post"></form>
It is only necessary to run the application with both users and verify that the user can not access the link admin
Well this was all, do not hesitate to leave your comment also you can see my full code in my GitHub repository or see this example in video. Thank you very much for reaching the end of the tutorial.
GitHub: HTTPS://GITHUB.COM/CRUIZG93/SPRINGBOOT-SECURITY-MYSQL

Hello @Cruizg93,
Couldn´t login…
org.springframework.security.authentication.InternalAuthenticationServiceException: could not execute query; SQL [select user0_.id as id1_2_, user0_.enabled as enabled2_2_, user0_.password as password3_2_, user0_.username as username4_2_ from user user0_ where user0_.username=?]; nested exception is org.hibernate.exception.DataException: could not execute query
If You can help…
Respecfully,
José Roberto
Hi Roberto, to start please share the whole stack trace of the error and your code, it is hard to identify the problem without seeing the code. Also in which part of the post you are getting this error?